 j-dunham
4.5 KiB
Configure Valet to work with GitLab
In this lab, you will use the Valet configure command to set up the required information to communicate with the GitLab and GitHub instances. The configure command can be used for all of the supported providers, in this lab we will be focusing on GitLab.
Prerequisites
- Followed steps to set up your codespace environment.
Configuring Valet
-
Run the setup script in the codespace terminal
source ./gitlab/bootstrap/setup.shto ensure the GitLab instance is ready. -
Login to the GitLab instance to generate a personal access token:
- Click the
PORTStab in the codespace terminal window. - In the
PORTStab find the row for port 80. - Hover over the address under the
Local Addresscolumn, and click the globe to "open in browser". - Login to the GitLab server with username:
rootand password:valet-labs! - follow the GitLab instructions to generate a token that has
read_apiscope. - Record token for a later step.
- Click the
-
Create a GitHub personal access token (PAT).
- Navigate to your GitHub
Settings- click your profile photo and then clickSettings. - Go to
Developer Settings - Go to
Personal Access Tokens->Legacy tokens (if present) - Click
Generate new token->Legacy tokens (if present). If required, provide your password. - Select at least these scopes:
read packagesandworkflow. Optionally, provide a text in the Note field and change the expiration. - Click
Generate token - Copy the token somewhere safe and temporary.
- Navigate to your GitHub
-
Run Valet configure commands
- In the codespace terminal window click back to the
TERMINALtab. - Run
gh valet configure - Use the down arrow key to highlight
GitLab CI, press the spacebar to select, then hit enter to accept. - At the prompt enter your GitHub Username and press enter.
- At the GitHub Container Registry prompt enter the GitHub PAT generated in step 3 and press enter
- At the GitHub PAT prompt enter the GitHub PAT generated in step 3 and press enter.
- At the GitHub url prompt enter the GitHub instance url or hit enter to accept the default, if you are using github.com then the default is the right choice.
- At the GitLab CI token prompt enter the GitLab CI access token from step 2 and press enter.
- At the GitLab CI url prompt enter
http://localhostand press enter. - At the Personal access token to fetch source code in GitHub prompt, if any of your Jenkins pipelines have source code in a GitHub repository enter the GitHub PAT that would have acess to these files.
- In the codespace terminal window click back to the
-
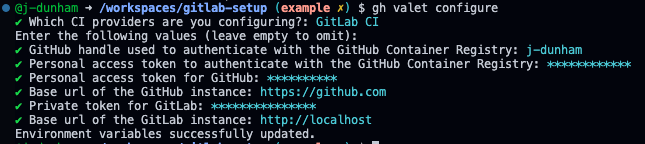
If all went well you should see a similar output in your terminal and a new file (.env.local) should have been created in the root of the project.
Verify Valet Works
To verify Valet works we are going to run a update and dry-run command. We will go further into details about the dry-run command in a later lab, but for now we want to get the latest version of Valet and confirm that Valet can perform a dry-run with no errors.
- In the codespace terminal update Valet by running
gh valet update - In the terminal you should see a confirmation that it logged into the GitHub Container Registry and pulled the latest version.
Login Succeeded
latest: Pulling from valet-customers/valet-cli
Digest: sha256:a7d00dee8a37e25da59daeed44b1543f476b00fa2c41c47f48deeaf34a215bbb
Status: Image is up to date for ghcr.io/valet-customers/valet-cli:latest
ghcr.io/valet-customers/valet-cli:latest
- Next, lets run the dry-run command in the codespaces terminal, to verify we can talk to GitLab
gh valet dry-run gitlab --output-dir ./tmp/dry-run-lab --namespace valet --project basic-pipeline-example - In the terminal you should see the command was successful, if not it is a good time to practice the configure command again and make sure the access tokens values are correct and were generated with the correct permissions.
