
3.3 KiB
3.3 KiB
Configure credentials for Valet
In this lab, you will use the configure CLI command to set the required credentials and information for Valet to use when working with Travis CI and GitHub.
You will need to complete all of the setup instructions here prior to performing this lab.
Configuring credentials
-
Create a GitHub Personal Access Token (PAT):
- Open github.com in a new browser tab.
- Click your profile photo in the top right of the UI and click
Settings. - Click on
Developer Settingsin the left hand panel. - Click
Personal Access Tokensand thenLegacy tokens(if present). - Click
Generate new tokenand thenLegacy tokens. You may be required to authenticate with GitHub during this step. - Select the following scopes:
read:packagesandworkflow. - Click
Generate token. - Copy the generated PAT and save in a safe location.
-
Create a Travis CI PAT:
- Open Travis CI in a new browser tab.
- Click on your profile icon in the top right hand corner to reveal a dropdown menu.
- Click on the 'Settings' tab.
- Click on the 'COPY TOKEN' button under "API authentication header" and save in a safe location.
-
Run the
configureCLI command:- Select the
TERMINALtab from within the codespace terminal window. - Run the following command:
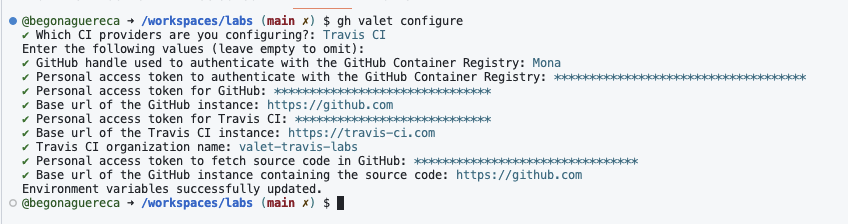
gh valet configure. - Using the down arrow key to highlight
Travis CI, press the spacebar to select, and then hit enter to continue. - At the prompt enter your GitHub Username and press enter.
- At the GitHub Container Registry prompt enter the GitHub PAT generated in step 1 and press enter.
- At the GitHub PAT prompt enter the GitHub PAT generated in step 1 and press enter.
- At the GitHub url prompt enter the GitHub instance url or hit enter to accept the default value (
https://github.com). - At the Travis CI token prompt enter the Travis CI access token from step 2 and press enter.
- At the Travis CI base url prompt hit enter to accept the default value (
https://travis-ci.com). - At the Travis CI organization name enter
valet-travis-labs. - At the access token to fetch source code in GitHub prompt enter the GitHub PAT generated in step 1 and press enter.
- At the GitHub instance url containing source code prompt press enter to accept the default value (
https://github.com).
- Select the
Verify your environment
To verify our environment is configured correctly, we are going to run the update CLI command. The update CLI command will download the latest version of Valet to your codespace.
-
In the codespace terminal run the following command:
gh valet update -
You should see a confirmation that you were logged into the GitHub Container Registry and Valet was updated to the latest version.
Login Succeeded
latest: Pulling from valet-customers/valet-cli
Digest: sha256:a7d00dee8a37e25da59daeed44b1543f476b00fa2c41c47f48deeaf34a215bbb
Status: Image is up to date for ghcr.io/valet-customers/valet-cli:latest
ghcr.io/valet-customers/valet-cli:latest